Basic Chartwork
| You
wouldn't want to attempt open ocean sailing using the information
presented here. But if you just need some basic charting skills
for limited coastal cruising and inland sailing, you might find these
simplified instructions helpful. |
Use this page in conjunction with Basic
Navigation.
Necessary Tools
| To
simplify things, I suggest you obtain and use a Chart Protractor. This
will eliminate the need for parallel ruler, and it makes plotting a
course much easier. |

Weems & Plath Protractor 255 |
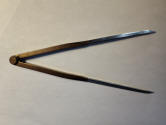
| You
will also need a set of dividers. There are different types.
Choose the one that feels most comfortable to you. |
 |
| And
lastly, you will need a chart for the area you wish to cruise.
There are two types of
charts: mercator and gnomonic.
Mercator charts have
parallel longitude and latitude lines, and they are used for coastal
navigation.
Gnomonic charts have
curved longitude and latitude lines, and they are used for long range
navigation.
|
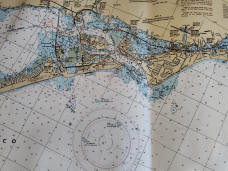
NOAA Chart #11425 |
Basic Information
| Charts
depth shows mean low water (i.e. average lowest daily).
All charts designate how the
depths are calculated.
Be aware that separate panels
in a chart might be calibrated using a different standard.
Always double check the depth
calibration in the panel and don't assume it will be the same as the
general chart.
|
Chart
Designations
|
Fathoms |
43
= 4 fathoms, 3
feet
03
= 0
fathoms, 3 feet |
|
Meters |
43
= 4.3 meters
03 = 0.3 meters |
| Underlined
number indicates drying time |
4
= 4 ft. above water line at low tide |
|
Plotting a course with no correction
for current
| 1.
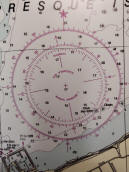
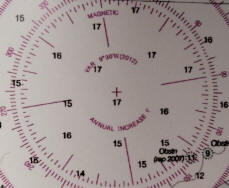
Determine Variation.
Variation is the
varying difference between true north and magnetic north. It
changes over time. Locate the compass
rose on the chart (or in the chart panel), and record the variation,
year, and annual change. (e.g. variation 11 degrees 22 minutes W (1985)
Annual change 7 minutes W). |
 |
| 2.
Determine Compass Error.
Subtract the variation
year from the current year, and multiply the difference by the annual
change. Add the result of the calculation to the chart variation to
determine the compass error. |
 |
| 3.
Record Compass Error.
Find the east and west
compass error markings around the rotating disk on the chart protractor
(Figure A). Place a pencil mark on the chart protractor to identify the
compass error correction you calculated (Figure B). (Be sure to pay
attention to whether the correction is East or West.) This pencil line
will be the line you use to read your course headings or bearings, and
you won't have to address variation again during your cruise if this is
the only chart you will be using. |
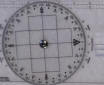
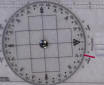
Figure
A
Figure B |
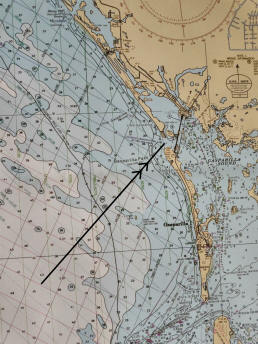
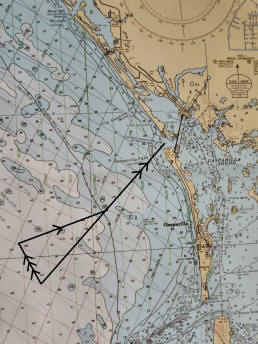
| 4.
Mark the Course.
Using a pencil, draw a
line on the chart for the course (or segment of a course) you wish to
travel. Mark the line with two arrows (i.e. >>) as this will
become your track line (i.e.
the actual course over which your boat will travel).
5. Check Water Depths.
Check the water depth
along the track line to determine that there is sufficient water depths
for your boat. If there is insufficient depth anywhere along the line,
consider altering the track line.
|
 |
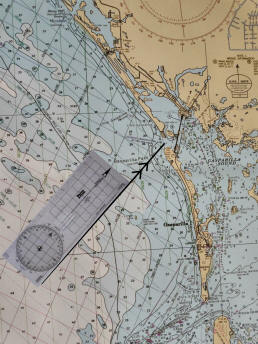
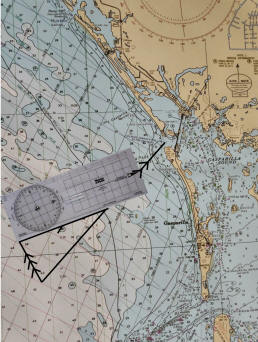
| 6.
Align the Chart Protractor.
Lay the chart
protractor along the track line. Be sure the chart protractor
directional arrow points in the direction of travel.
7. Align the Chart
Protractor Disk.
Rotate the protractor
disk so it points north and the internal grid lines inside the disk
align with a longitude or latitude line on the chart. (This may require
repositioning the chart protractor along the track line.)
8. Determine the
Course Heading.
Use the pencil mark on
the compass error markings to read the course heading.
|
 |
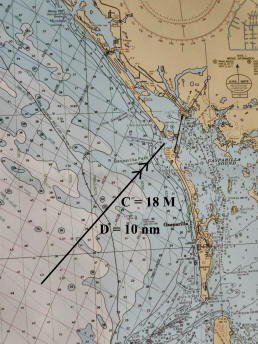
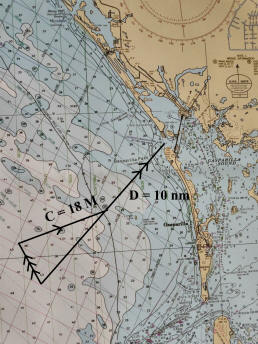
| 9.
Record the Course Heading on the Chart.
Record the course
heading along the track line. (If in a sailboat, see #11 below.) Place an M after the course heading (e.g.
C = 18 degrees M). You have recorded the magnetic (M) course-to-steer.
As long as you navigate using your compass, there are no further
corrections needed. (Note: This makes the assumption that
your compass does not need correction for deviation--see Basic
Navigation.) The track line becomes the course-to-steer line
because there are no adjustments necessary due to leeway or current.
10. Determine and
Record Distance.
Measure the
track/course line with the dividers, and use the latitude minute
markings on the side of the chart to determine the distance. (Remember:
1 minute latitude = 1 nautical mile.) Record the distance on the
track/course line (e.g. D = 10 n.m.)
|
 |
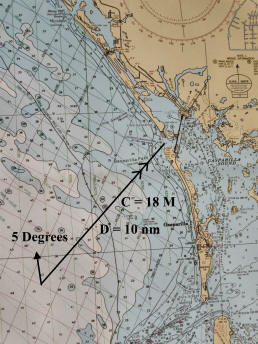
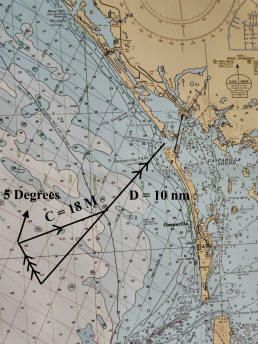
| 11.
Leeway.
If in a sailboat, you
must compensate for leeway (i.e. the sideways motion of the boat pushed
by the wind as it makes headway.)
12. Determine Wind
Direction and Leeway.
Determine the wind
direction and how much leeway affects your boat. Most boats have 5 - 10
degrees leeway, and this can be affected by the amount of wind and the
direction of travel in relation to the wind. You will have to make a
determination for your own boat. (You can determine the leeway of
the boat by using a handheld compass at the stern of the boat to site
the track line left by the boat's wake. The difference in degrees
between the track line and the compass course steered is the boat's
leeway. It can be affected by increased winds, angle of the wind,
and sea conditions.)
13. Record
Corrected Course Heading.
Do not enter leeway as
a vector in your chart plotting, but manually add or subtract it from
your final course heading calculation, and record the corrected course
heading on the course line. An additional smaller vector arrow is added
to the track line at the beginning point that indicates the recorded
course heading has been corrected for leeway. You can record the degrees
of leeway at the end of the small vector arrow. (E.g. if the wind is
blowing out of the north, causing 5 degrees of leeway to the south, the
corrected course-to-steer would be 85 degrees to compensate for the 5
degree of leeway.)
|
 |
Plotting a course with a correction for current
| 1.
Determine Variation.
Variation is the
varying difference between true north and magnetic north. It
changes over time. Locate the compass
rose on the chart (or in the chart panel), and record the variation,
year, and annual change. (e.g. variation 11 degrees 22 minutes W (1985)
Annual change 7 minutes W). |
|
| 2.
Determine Compass Error.
Subtract the variation
year from the current year, and multiply the difference by the annual
change. Add the result of the calculation to the chart variation to
determine the compass error. |
|
| 3.
Record Compass Error.
Find the east and west
compass error markings around the rotating disk on the chart protractor
(Figure A). Place a pencil mark on the chart protractor to identify the
compass error correction you calculated (Figure B). (Be sure to pay
attention to whether the correction is East or West.) This pencil line
will be the line you use to read your course headings or bearings, and
you won't have to address variation again during your cruise if this is
the only chart you will be using.
|
Figure
A
Figure B |
|
4.
Mark the Course and Estimate Time.
Using a pencil, draw a
line on the chart for the course (or segment of a course) you wish to
travel. Mark the line with two arrows (i.e. >>) as this will
become your track line (i.e. the actual course over which your boat will
travel).
5. Check Water Depths.
Check the water depths
along the track line to determine that there is sufficient water depth
for your boat. If there is insufficient depth anywhere along the line,
consider altering the track line.
6.
Identify any Currents.
Identify the current
from a current marking on the chart or from a cruising guide. Record its
set (direction) and drift (speed in knots) (e.g. current = 0 degrees due
north at 1 knot). Currents on charts will be identified with arrows;
exact directional degrees will not be given. The current's speed in
knots will be listed beside the arrow. (See Tides
& Currents for determining set and drift of current while
underway.)
|
|
| 7. Draw a Current
Vector.
Draw a current vector in the direction of the
current from the starting
point on the track line. The length of the vector should match the
distance an object pushed by the current would travel in one hour using minutes of latitude (e.g.
a 1 knot current travels 1 nautical mile in one hour or 1 minute of latitude). Use the dividers to determine the length of the
current vector based on the latitude markings on the side of the chart
and mark the current vector on the chart with three arrows ( i. e.
>>>).
8. Draw the Course
Line.
Determine your
probable boat speed over that hour of travel, and set your dividers to
match that speed where one knot of speed corresponds to one minute of
latitude. Place one end of the dividers on the end of the current
vector, and swing the dividers until the other end intersects the track
line. Draw a line from the
end of the current vector to where the dividers intersect the track line.
This is your course-to-steer line, and it should be marked with one
arrow (i.e. >).
NOTE: In the illustration to the right, the course line happens to
intersect the track line at the destination (by chance), but it could
intersect anywhere on the track line before or beyond the destination.
Never draw the course line to the destination unless it naturally
intersects there. Draw the course line to the intersection point even if
falls before or beyond the destination. |
 |
| 9.
Align the Chart Protractor.
Lay the chart
protractor along the course line. Be sure the chart protractor
directional arrow points in the direction of travel.
10. Align the Chart
Protractor Disk.
Rotate the protractor
disk so it points north and the internal grid lines inside the disk
align with a longitude or latitude line on the chart. (This may require
repositioning the chart protractor along the course line.)
11. Determine the
Course Heading.
Use the pencil mark on
the compass error markings to read the course heading.
|
 |
| 12.
Record the Course-to-Steer.
Record your
course-to-steer above the course line (e.g. C = 36 degrees M). This is
the magnetic course you will steer to end up at your destination having
accounted for the current. (Note:
This makes the assumption that your compass does not need to be
corrected for deviation--see
Basic Navigation.)
13. Record the
Distance.
As you did in Step 4,
measure the track line
with the dividers, and use the latitude minute markings on the side of
the chart to determine the distance. (Remember 1 minute latitude = 1
nautical mile). Record the distance on the track line (e.g. D = 10 n.m.).
Use the distance and speed to compute your anticipated time in route.
|
 |
| 14.
Leeway.
If in a sailboat, you
must compensate for leeway (i.e. the sideways motion of the boat pushed
by the wind as it makes headway.)
15. Determine Wind
Direction and Leeway.
Determine the wind
direction and how much leeway affects your boat. Most boats have 5 - 10
degrees leeway, and this can be affected by the amount of wind and the
direction of travel in relation to the wind. You will have to make a
determination for your own boat. (You can determine the leeway of
the boat by using a handheld compass at the stern of the boat to site
the track line left by the boat's wake. The difference in degrees
between the track line and the compass course steered is the boat's
leeway. It can be affected by increased winds, angle of the wind,
and sea conditions.)
16. Record
Corrected Course Heading.
Do not enter leeway as
a vector in your chart plotting, but manually add or subtract it from
your final course heading calculation, and record the corrected course
heading on the course line. An additional smaller vector arrow is added
to the track line at the beginning point that indicates the recorded
course heading has been corrected for leeway. You can record the degrees
of leeway at the end of the small vector arrow. (E.g. if the wind is
blowing out of the north, causing 5 degrees of leeway to the south, the
corrected course-to-steer would be 85 degrees to compensate for the 5
degrees of leeway.) |
 |
|